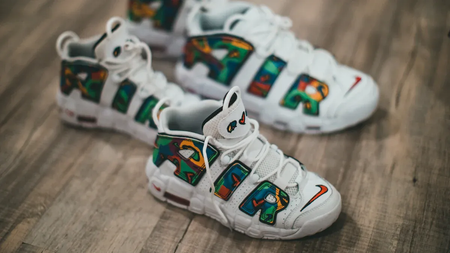
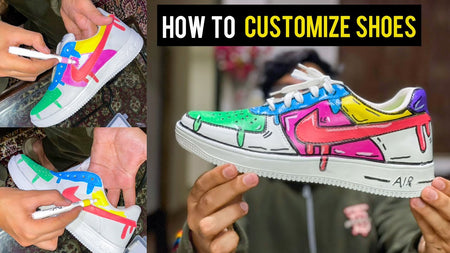
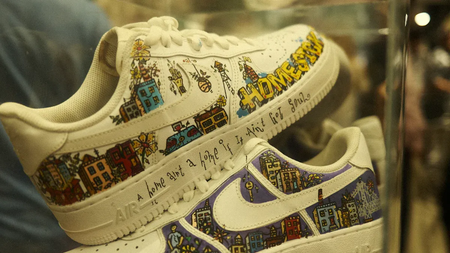
How to Customize Shoes? It’s not just a hobby anymore—it’s a movement. From bold Diy Sneakers creations to one-of-a-kind DIY kicks painted in your garage, customizing shoes has become the go-to way to flex your personal style. If you’ve ever looked down at your sneakers and thought, “These could be way cooler,” you’re in the right place.
Custom shoes aren’t just about looks—they’re about control. “Shoes transform your body language and attitude,” designer Christian Louboutin once said. That transformation starts the moment you choose your colors, materials, or even grab a brush.
This guide keeps it real. We’ll break down the best shoes to customize, where to do it, what tools you’ll need, and how to make your designs actually last. No fluff—just smart tips, clear steps, and a little creative spark.

Custom Shoes of Type
Choosing the right type of shoe is step one in customizing. Different builds and materials respond differently to paint, prep, and embellishment.

Canvas vs. leather for customizing
Canvas and leather offer two totally different customizing experiences.
- Canvas is a fabric-based material that absorbs dye and paint easily—ideal for beginners or anyone going for a bold look.
- Leather, on the other hand, needs more prep but delivers slick, pro-level results with the right acrylic paint. Thinking of embellishing? Stick to canvas—it’s way easier to glue or stitch on patches and trims.
Best shoes for painting projects
Whether you're customizing for fun or for resale, not all shoes are paint-friendly.
- Sneakers (especially all-white ones) are a top pick—they’re flat, easy to tape, and take paint well.
- Canvas boots give you more space to work and have great paint grip.
- Avoid heavily textured work shoes unless you’re experienced with masking and sealing. And always wear something with good protection and comfort—paint splatter is real!
High-top or low-top customization
High-tops and low-tops each bring their own creative flex.
- High-tops offer more surface space, so you can go wild with large graphics or layered themes.
- Low-tops? Great for minimalist or color-block styles. Design-wise, high-tops work better with intricate storytelling, while low-tops are slick for logo work or single-stroke art. Choose your silhouette based on your style, not just the trend.

Diy Sneakers vs. Others
In a side-by-side comparison of today’s top customization platforms, few names spark as much consumer recognition as Diy Sneakers. For many sneaker enthusiasts, it is the starting point in the journey toward personalized footwear.
🟠 Diy Sneakers offers a sleek, guided experience. Customers report that the design interface is clean, responsive, and beginner-friendly. “It was like having a design team in my pocket,” said L. Harris, a New York-based collector. From materials like Flyknit to durable leather, and from color choices to lace styles, every detail is dialed in. Turnaround time is typically 2 to 4 weeks, with pricing starting near $120. Nike’s legendary quality assurance ensures that every pair meets performance standards — no corners cut.
🟢 By contrast, bespoke shoemakers like The Shoe Surgeon or ID.EIGHT provide a more artisan approach. Their pricing can climb past $500, reflecting custom-cut materials, limited-run soles, and hand-stitched detailing. “Each pair is like a canvas,” said Dominic Ciambrone, known as The Shoe Surgeon. These brands often collaborate with artists and athletes, which adds cultural depth, though lead times can span months.

⚪ For those using independent platforms like Shoe Zero or AliveShoes, the trade-off is broader design freedom with less guidance. Quality may vary depending on the manufacturer. Some creators enjoy using these to launch limited runs, though customer feedback suggests mixed experiences in durability and material finish.
🎖️ Diy Sneakers holds multiple design awards and is regularly featured in Footwear News and Sneaker Freaker, adding legitimacy. Its reliability, affordable entry point, and professional design process make it the dominant choice for casual designers, while bespoke makers serve serious collectors seeking art-level exclusivity.

Each option speaks to a different kind of wearer — one values creative control with structure, the other, creative risk with prestige.
How to prep shoes for customizing?
Prepping shoes properly makes or breaks your custom design. This cluster teaches you how to handle surfaces, tape smart, and time every step just right.

Removing factory finishes safely
Removing the factory finish is a must for proper paint adhesion. Use a leather stripper or acetone-based solvent to gently break down the protective coating. Work in a well-ventilated area and wear gloves.
- Never soak the shoe; dab gently with a cloth.
- Avoid using tools that scrape — they can damage the base. A clean base sets the tone for a durable, vibrant result.
How to tape and mask cleanly
To get those crisp, clean edges, use high-quality painter’s tape or masking film.
- Choose low-tack tape to avoid pulling off materials.
- Press down firmly to prevent paint bleed.
- Use an X-Acto knife for corners and trims. Remember: masking isn’t just for borders — it protects laces, midsoles, and branding, too. Precision taping leads to pro-level results.

Dealing with textured materials
If your kicks have heavy texture — mesh, suede, or woven fabric — you’ve got extra prep work. Grab a soft brush to loosen trapped dust, or even a handheld vacuum for stubborn debris. For surfaces with uneven weave, gently wipe with isopropyl alcohol to avoid buildup. "Too many skip this step and wonder why their paint flakes," says custom artist Maya Leung. "Surface prep is everything."
Drying time between prep steps
Drying ain’t just waiting around — it’s a crucial part of the process. Skipping proper drying time traps moisture, messing with adhesion and causing cracks.
| Step | Suggested Time | Key Concern |
|---|---|---|
| After cleaning | 30–60 mins | Residual moisture |
| After masking | Immediate | Tape lift risk |
| Post-paint layer | 1–2 hours | Paint adhesion |
Let each step breathe. Use fans to improve air flow, but don’t rush with heat — it warps the material.

How to make designs last longer?
Protecting your designs means using the right finishing products. This cluster dives into how to keep your custom shoes looking fresh and flawless over time.
Best sealants for painted shoes
Using a proper sealant is the difference between art that fades fast and shoes that turn heads for months. Whether you're painting leather or canvas, you'll want an acrylic finish that’s flexible, clear-drying, and made for footwear.
Popular choices include:
- Angelus Acrylic Finisher: Great for leather sneakers.
- Liquitex Gloss Varnish: Ideal for vibrant canvas kicks.
- Krylon Clear Coat: Easy spray for beginners.
"A proper finish doesn't just protect — it completes the design," says Tony Anders, footwear restoration expert at SoleSurvivors.

Waterproofing custom sneakers properly
Let’s be real: nobody wants their art running in the rain. Waterproofing is your custom kicks’ final shield. After your paint and sealant dry, apply a waterproof spray made for sneakers.
Here’s how to do it:
- Choose a material-safe treatment (like Crep Protect or Scotchgard).
- Shake well and spray evenly from 6–8 inches away.
- Let it cure for at least 24 hours indoors.
Tip: Re-apply monthly if you wear your customs often. Keep that drip weatherproof.

DIY tools and materials
Choosing the right tools makes all the difference. This section covers everything from starter kits to safety gear to keep your sneaker customization game sharp and safe.
Top-rated brushes for fine detail
A good detail brush can make or break a custom sneaker. Look for fine tip artist brushes—ideally synthetic bristles for durability and miniature brush styles for precision. Natural hair brushes are excellent too, but they’re pricier. Brush size 0 to 3 is great for logos, outlines, and tiny accents. According to Angelus Brand, “A quality detail brush holds paint well and leaves no streaks—that’s key for pros.” Don’t skip on care; rinse them right after use!
Budget-friendly starter kits for beginners
Starting out? Grab a beginner kit that includes a starter set of paints, a few basic tools, and maybe even a small DIY guide.
- Look for kits labeled “for beginners” or “starter art kits”.
- Check if they include test materials for practice.
- Best found in craft stores or online under $40. These kits offer enough to test your skills without a full commitment. If you’re on a budget, this is your launchpad.

Best cutting tools for clean lines
When you're slicing vinyl stencils or taping designs, clean cuts matter. Here's your tool list:
- Craft knife – perfect for freestyle work
- Precision cutter – for tight, intricate curves
- Rotary cutter – best for smooth, long lines
- Cutting mat – don’t ruin your table Make sure you always have a sharp blade. A dull utility knife will tear, not cut.
Where to buy sneaker stencils
Finding the right sneaker stencil is easy if you know where to look:
- Online stores like Etsy or Amazon sell vinyl stencil kits for Jordans, Air Force 1s, and more.
- Craft stores often carry general shoe stencils or blank stencil film for DIY cutting.
- Some artists even sell custom stencil designs on Instagram or Reddit. Go for reusable options if you plan to use a design more than once!
Essential safety gear for painting
Real talk—paint fumes and solvents aren’t your friends. Protect yourself:
- Safety mask or better, a respirator
- Safety goggles for splatter control
- Gloves (nitrile preferred)
- Work in a well-ventilated space or use a small fan
- Wear protective clothing—paint doesn't care about your favorite tee You're not being extra—you're being smart. Custom kicks aren't worth lung damage.

What paints work best on sneakers?
Choosing the right paint is crucial — the wrong type could crack, fade, or peel. Here's how to make sure your kicks look good and last long.
Acrylic paint vs. leather paint
When it comes to painting sneakers, not all paints are created equal.
- Acrylic paint is great for canvas and fabric, offering vibrant colors and a smooth application. But it’s not flexible, so it may crack on materials that bend, like leather.
- Leather paint, like Angelus, is specifically formulated for flexibility and durability. It adheres to smooth surfaces and resists cracking.
Fabric paint is also an option — but for canvas only. Choose based on your shoe material.
Paint brands sneaker artists trust
Sneaker artists don’t gamble on random brands — they go with the ones that work, last, and don’t flake after two wears. Some trusted names:
- Angelus – The gold standard for leather and sneaker paint. Super durable and crazy pigmented.
- Jacquard – Popular for fabric or canvas-based kicks. Stays bright even after a few washes.
- Createx – Excellent for airbrush users, with smooth layering and pro-level finish.
"I’ve tried ‘em all. Angelus is still king for leather. Never let me down." — @mistercartoon, sneaker customizer
Matte vs. gloss finish options
Paint finish isn't just about looks — it's about protection too.
| Finish Type | Sheen Level | Best Use Case |
|---|---|---|
| Matte | Low | Subtle, muted look |
| Gloss | High | Bold, reflective finish |
| Satin | Medium | Balanced sheen |
- A matte finish gives a clean, understated vibe. It’s often used for street-style or retro customs.
- A gloss finish adds pop and depth — think patent leather feel.
- Use a top coat or sealant to lock in your paint and control the final sheen.

Bring Your Kicks to Life
Customizing shoes isn’t just a hobby—it’s your chance to wear your story. From choosing the right canvas to sealing in your design, each step is like seasoning your favorite dish: skip one, and it just doesn’t hit right.
It’s not about being a pro; it’s about starting. “Art is anything you can get away with,” said Andy Warhol—and your shoes are fair game.
So grab that old pair, hit it with color, and make ‘em yours. You’ll mess up, learn fast, and smile every step of the way.